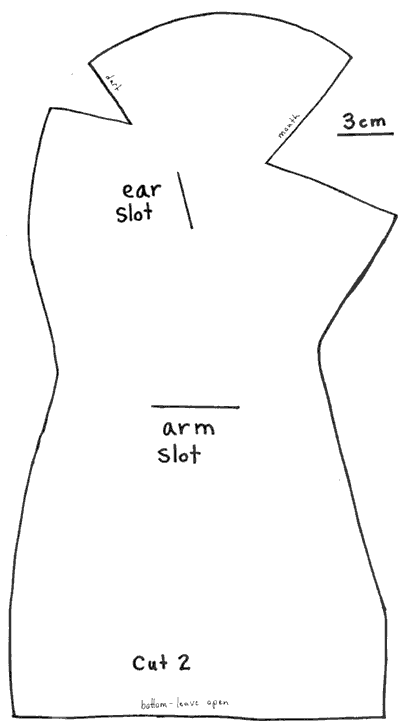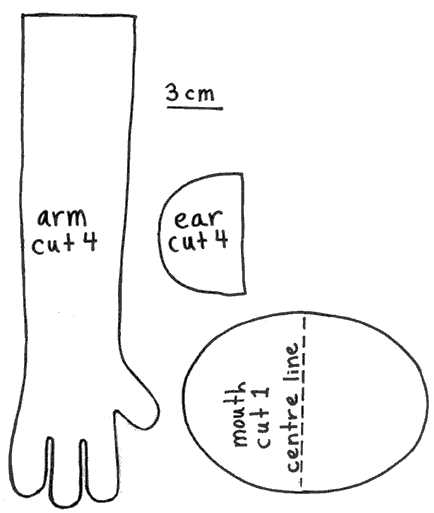
Puppet Pattern
This easy pattern makes
a pleasing and expressive puppet. The basic pattern is extremely versatile and
can be used to create any number of characters from people to animals or anything
else you can think of. Anyone with basic sewing skills can do this project.
Expect to spend about 5 to 7 hours completing the puppet. For first-timers I
recommend using fleece. Later, as you gain experience, try fun fur or other
textured fabrics. A sewing machine is an asset but is not necessary.
Materials:
• Roughly 1/2 meter fabric.
• Flexible foam sheets from craft store, 1/8’’ thick, various
pinks, black, red etc.
• Good quality fabric scissors.
• Needle, thread, pins, fabric marker.
• Sewing machine (optional).
• One coat hanger (optional).
• Needle nose pliers.
• Hot glue gun.
Directions:
1. Increase the size of
the patterns on a photocopier until the "3 cm" lines actually measure
3 cms. If you have small hands, or the puppet is for a child, make the line
equal 2 to 2 1/2 cm.
2. Cut out the fabric using the patterns.
3. Sew the arms together and turn them right side out.
4. If you wish to attach arm rods to your puppet (not recommended or necessary
if the puppet is to be given to a young child) bend one end of a coat hanger
into a small loop and bend the other into a handle. Wrap the handle end in duct
tape. Cut a small hole in the bottom of the hand (opposite the thumb) and insert
the loop end of the coat hanger into the hole. Turn the arm inside out and attach
the loop of the arm rod to the top seem inside of the hand (near thumb) using
a safety pin or stitch.
5. Cut along the 2 arm slots on the body of the pattern.
6. Insert each arm through the arm slots so that the thumb points forward and
the top of the arm comes through on the wrong side of the body.
7. Sew arms in place by folding the body along the cut line and stitching the
top of the arm in place.
8. This step is optional depending if you want your puppet to have ears or not:
Sew around the curved edge of the ear pattern. Cut the ear slot line on the
body pattern. Sew in the ears using the same method as the arms. (Remember ears
can be pointy, big or small, use you imagination).
9. Now for the body: Sew the Darts on the back of the head closed. With the
good sides together and the arms tucked out of the way, sew from the bottom
of the puppet, around the back of the head to the top of the mouth. Next, sew
from the bottom of the mouth to the bottom of the body.
10. Before going any further test fit the puppet to your hand.
11. Now in stall the mouth: Cut the mouth pattern from flexible foam sheets
available from craft stores or use fabric. If fabric is used, you can go back
and reinforce it later with cardboard. Keeping the puppet inside out, hot glue
the mouth in place with the right side of the fabric glued to the foam.
12. The puppet can now be turned right side out.
13. Add finishing touches (hair, nose, tongue etc.), as you desire.
14. Remember to "cross" the eyes slightly to achieve a more realistic
glare.
Have fun!

